Thursday, July 31, 2014

ONLINE MONEY EARNING TRICKS

using internet is very common nowadays.......
To get recharge for every time you spend on is a good trick.
By just spending few minutes get free recharges from rs.10 to 100
Here are some sites offering free recharge 

1.PAISALIVE.COM

paisalive.com offers 99.rs for instant sign up and you can earn money faster than any other sites...
earn money by just visiting sites and e-mails

click-here to get register for paisalive


Saturday, April 5, 2014

Hack Windows XP/7/8 admin password easily without any software

Hello guys. Here's a new 100% working trick to hack windows password .
I know there's a lot of softwares out there to get it done . But thats not geeky & also not time consuming . The real fun is when you can hack this manually within just a few minuets .

So here are the steps to do it.

Required things:

1) Windows 98 bootable USB drive ( We will learn to make it as we proceed) .
2) Basic knowledge of DOS commands .
3) Basic knowledge of how to boot your PC from a USB drive .

Theory:

Now you may wanna know the theory behind this hack . So here's how we do it .
In windows we can change the password of the PC with command prompt very easily .
with the command line net user username password . (replace username & password with the credentials you want ) . But this can be possible only if you have admin access to the command prompt . A command prompt with admin access is called elevated command prompt . When you simply open a command prompt window it brings you to the C:\users\username directory . But in an elevated command prompt you are brought to the C:\windows\system32 directory .

So if we can start an elevated command prompt window in the windows login screen, then we can run the above said command and change the password to what we want . So the main problem is how can we do this .


There are some programs which we can run directly from the login screen. These are our keys to hack a windows password .
The programs are:
1) sethc.exe ( windows xp , windows vista )
2) narrator.exe ( windows 7 , 8 )
3) magnify.exe ( windows 7 ,8 )
There are more but these will be enough for us . In windows 7 & 8 we can access them by clicking on the " Easy of Access " button in the login screen & then selecting "narrator" or "magnifier" then "apply" & then "OK"

All these files are stored in the C:\windows\system32 folder . And also the file for command prompt is stored in this folder ( named cmd.exe ).

So if we can replace one of those above mentioned files with cmd.exe & then if we start those programs in login screen, we can get an elevated command prompt & then type the net user command to change the password & we can gain access to the system .

Now the question is how to replace those files with command prompt when we have no access to the system ? The answer is by using a live OS which we can boot from an external USB drive & then accessing the file system through it. Most people will suggest you to use a Ubuntu live CD . But Ubuntu is near about 800 MB in size . So I'll suggest you to use MS-DOS 98 with an external usb drive which is 3 MB in size .

Now here are the steps to make a Bootable MS-DOS 98 usb drive:

1) Download DOS 98 from the link given below .
2) Download HP USB Disk Storage Format Tool form the below link .
3) Unzip & install the HP USB Disk Storage Format Tool .
4) Unzip DOS 98.zip and extract the folders ms-dos & ntfs dos . Remember the location .
5) Plug in your USB drive ( pen drive ) in your pc . ( make sure you backed up your contents of the pen drive, because your pen drive will be formatted . )
6) Now run HP USB Disk Storage Format Tool . ( in windows 7 right click on it & run as administrator ).
7) Now on the device window select your pen drive . In my case it's kimgston data travelar... . 

8)now in the file system select FAT . & tick both "quick format" & "Create a dos startup disk" .
9) now click on the 3 dots next to the box & select the ms-dos folder you extracted earlier . & press ok .


10) Now press start . Let the process complete .
11) Now copy the contents of NTFS folder in your pen drive .
Thats it . Now your bootable USB pen drive is ready .

Now here comes the main part.

Booting the target PC with this pen drive:

Switch on the target pc with the pen drive pluged in . And wait until a black ( sometime blue ) screen appears . There you will see some options like ** to enter setup , ** boot menu etc . In my case it's like F10 - to enter setup , Esc - Boot menu . Press the button which says Boot menu ( in my ps it's Escape button ) & select the pen drive from the list of available devices. Now you should see the dos window .

*Check your PC's BIOS manual for more info on accessing boot menu. Some PCs don't have the Boot menu . In such cases you need to Enter Bios setup by pressing the particular key ( in my case it's F10 ) & then change the boot device order as Removable media in the first place .

**To know more about how to change boot order of a PC follow these links or refer to the BIOS manual.

http://lifehacker.com/5991848/how-to-boot-from-a-cd-or-usb-drive-on-any-pc
http://pcsupport.about.com/od/fixtheproblem/ss/bootorderchange.htm


Real Hacking Begins Here:

If you booted correctly from the usb drive, you should now see the dos prompt. something like this with the C:\ prompt .

Now the first thing to do is to find out the windows instalation directory .
For this just change the drives serially , check for the windows directory in that drive with dir command .

Your commands should look like this:
C:\> D:  (press enter)                                              --------- Changes the prompt to drive D.
D:\> dir (press enter)                                               ---------  Lists all the files and folders in the drive D .
D:\> some results with files & folders.                       --------  Search for the windows folder here.

You should probably find it here in the drive D . If not then change the dir again to E . 

D:\> E:   (press enter)                                                --------- Changes the prompt to drive E.
E:\> dir   (press enter)                                               ---------  Lists all the files and folders in the drive E.
E:\> some results with files & folders                          --------  Search for the windows folder here.

If not found repeat the process with F , G , H , drives serially untill you get the windows folder .
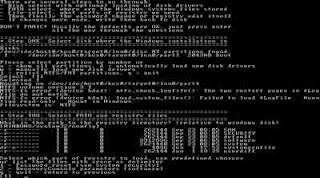
In the below image the windows folder is in C drive . We get the below result after executing the following command .
C:\> dir (press enter )


 Now suppose you get the windows folder in D: drive .
You should return on the D:\> prompt automatically .

Now type the command cd windows\system32 (press enter).
You should now see D:\windows\system32> on the prompt .
Now type the following commands exactly as they are.

copy narrator.exe c: ( press enter )

copy cmd.exe c: (press enter)

del narrator.exe  (press enter)

ren cmd.exe narrator.exe (press enter)

 This should look like this.

 Thus we replaced the narrator.exe file with cmd.exe .

Now whenever we start the narrator process we will get the Elevated Command Prompt .

Changing The Password:
Now restart your PC normally . without the pen drive plugged in .
Now when you are on the login screen . Click on Easy of access on the left bottom corner . And tick the narrator > Apply > OK . In no time you'll get a command prompt window . Like DOS .

Now type in the command net user your_username your_new_password .
Suppose the user name is computer , then type net user computer 12345 (enter) . And the new password will be 12345 .
Now close the command prompt & enter your new password in the box & go . Bingo ! now you have access to the system .

***Note
In windows xp there's no "easy of access button" so you have to change the commands a little .


copy sethc.exe c: ( press enter )

copy cmd.exe c: (press enter)

del sethc.exe  (press enter)

ren cmd.exe sethc.exe (press enter) 

 And then on the login screen press "shift" key five times in a row & the command prompt will appear . Least of tutorial is same for windows xp .

If i was not clear at any point please let me know to help you out in the comments section.

This hack was successfully tested on win 7 & 8 . But i hope the above said WIN XP hack will also work . Let me know if it works.

I'm posting this tutorial only for the password recovery purpose in case you forgot your windows password . I'll not be responsible for any kind of illegal usage of this tutorial .  

 
Download links to the files:

 HP USB Disk Storage Format Tool

 MS-DOS 98+NTFS DOS

Multitask on Nokia S40 phones / Minimize Apps On Nokia s40 /Hack Nokia s40

Hello guys , time for a really cool trick . Ever wanted to multitask on your nokia s40 phones (Java Phones) .
Now its time to learn how . You can really switch between multiple apps and access your phone system while browsing net(via some app) or running some apps in background .

You may have noticed those tutorials on net saying hack your Nokia s40  with JAF . But those don't works with all Nokia s40 phones. But here I'm gonna show you how to do the same with Phoneix Service Software . This process is really easy & works in 90% cases .


NOTE: LINKS TO DOWNLOAD THESE SOFTWARES ARE GIVEN AT THE END OF THE POST OR YOU CAN GOOGLE IT .

So lets start.

Step 1

1)  Download Phoneix Service Software from the below link.
2)  Install it on your pc .
3)  Download & Install Nokia ovi Suite .
Step 2

1)  Connect your phone with your pc via Data Cable.
2)  Select "Nokia OVI Suite" on your phone when prompted .
3)  Nokia OVI suite should appear on your desktop ; Close it .
4)  Now run Phoneix .

Step 3

1)  You'll see no connection at the connection box.
2)  Click on it you'll see something like USB 1
                                                          USB 2
                                                          etc.
3)  Now click on the connection which looks like USB X -RM-XXX
4)  USB 1,2,3... can vary depending upon which usb port you are connecting .
5)  And RM-XXX is your phone's RM version. You can also get it by dialing *#0000# on the home screen.
6)  In my case it looks like USB-2-RM-704.
7)  Click on your connection (USB X-RM-XXX).
8)  Now you will see Ready at the bottom left corner.
9)  your phone is now connected.

Step 4

1)  Now goto FILE => Scan Product . Or just press Ctrl+R on the main window.
2)  You'll get your phone's details on the screen , right beside the READY dialogue .


Note 2 : In the next step you need the Product Profile of your phone. which looks like rm_xxx.ppu .
You can download it from google or just post your phones RM version as comment along with your mail id to get it right inside your mailbox. Download it and save it anywhere you can access easily. 


OK lets back to the topic.


Step 5

 1)  Now goto Product => Product Profile .
 2)  A new window will come up named Product Profile.
 3)  Now click on Browse and choose your product profile ( What we talked about at note 2 ).
 4)  You will see a table.
 5)  Now click on Activate button.
 6)  Scroll down to the line number 48 in table below ( line no. 28 in case of s40v3 phones ).
 7)  You'll see a field named Java TCK support.
 8)  And the default value is  Java TCK - off .
 9)  Double click on the value and select Java TCK - on .
10)  Click on Write .

Step 6

1)  Switch off and on your device.
2)   Warning TCK flag set.

  Thats it you have successfully hacked your phone .

  Ok now come to the next point. To be able to minimize apps we have to do one more step .

  Editing the app which you wanna minimize.


Step 1


1) Download the java app on your pc. ( with .jar extension )
2) Now Right click on the app & Open with any zip reader. ( Like Winrar , 7-Zip etc.).
3) Inside that you'll get a folder named Meta-Inf . Open it.
4) You'll get a file named MANIFEST.MF.
5)  Edit that file with notepad . ( simply double clicking the file will do that. ).
6)  Now at the very end add this line exactly in the following case order.
7)  Nokia-MIDlet-no-exit: true .
8)  Now save the file by pressing Ctrl+S and exit the editor.
9)  The zip archive will ask you for updating the archive . Press yes to update .


Step 2


1)  Now send the app to your device via Bluetooth or Data Cable .
2)  Run the app .
3)  Press the Home key on your mobile . ( I mean the red key used for exiting the apps . )
4)  Thats all your app is minimized.
5)  Run it again by going to the app . And quit it by the apps quit option.


Download links :

I'll update the links very soon.

Successfully tested on --- Nokia 5130 Xpress-Music
                                        Nokia 2730c
                                        Nokia C2-00 ( with limitation of one app at a time ).

Warning : Do at your own risk..... Though its the most safe method.
This tutorial is for educational purpose only . I'm not insisting anyone to hack nokia phones .


Monday, February 24, 2014

Download exe files blocked by the server

This happens most of the times that we wish to download certain file like a .zip file or an .exe
file from the internet at our college, school or office but the downloading is blocked from the server.So here is the way how you can download any file from the net even if it is blocked.
Solution:
The best possible solution can be to download the file in some encrypted format whose extension is unknown to the server and later rename the extension after the downloading. This is the principle used by an online tool “Download at Work” that enables us to download any type of file from the internet even if it is blocked at the server.
How it works:
• We have to enter the URL of the file that we need to download.
• Then choose the extension that we want our file to get encrypted into like .doc, .pdf etc.
• We can also choose the extension to be .aaa which would be unrecognized by the server.
• After the downloading we just need to rename the file in the original format.
But let me remind you that this method will only work until your administrator comes to know about it.

Same thing can be down to upload a file or attach in mail....

Recover Windows Password With Free Password Recovery Tools

There are times when you forget your Windows password or someone changes it without your knowledge. In such situations, you will be locked out of Windows. To regain access, you can use some password recovery software to recover your Windows password. This article contains a list of some such password recovery software.


Recover Windows Passwords Free
Note:  Most of these software are available as Live CD's. (For non technical readers, a Live CD is a compact disk that contains a bootable operating system that you can use from the CD itself, without having the need to install it.)

Ophcrack
Ophcrack offers one of the best free password recovery solutions in the market. Ophcrack comes in two versions: a stand alone installer and a Live CD. The stand alone installer requires you to additionally download separate rainbow tables whereas the Live CD already has them. As the stand alone installer uses about 1.5GB of rainbow tables, it offers much better recovery. However, the download size is certainly an issue. Also, the Live CD version is a bit easier to use for cracking passwords.

recover Windows passwords

So, I will discuss only the Live CD version. You must choose the right version of Ophcrack Live CD for your operating system. If you use Windows XP, the download (Ophcrack XP Live CD) is nearly 415MB whereas for Windows 7, Windows Vista and Windows 2008, it (Ophcrack Vista Live CD) is about 495MB. Ophcrack may be identified as a virus by your anti-virus software. That is a false alert and should be reported to the antivirus company.

To crack passwords with Ophcrack, download the iso file for the appropriate Live CD and burn it on a compact disk using an image burning software. If you use Windows 7, you can use your OS's inbuilt image burning software.

Then boot the computer whose password you wish to recover using that disk. Ophcrack is fully automatic and you don't need to do anything from your side. It will automatically detect users and start the password recovery process. Then, it will display their passwords on the screen. You can note them for logging in to the locked account.

Ophcrack recovers passwords nearly 99 times out of 100. Ophcrack is limited to recovering passwords upto 14 characters.

PC Login Now
If you mind downloading large amounts of data Ophcrack needs, then PC Login Now is an excellent alternative. In addition to its smaller size, its password recovery is one of the fastest and the easiest I have seen. However, PC Login Now does not actually recovers your password. It resets it.

File Recovery Windows free

To get started, you will need to download a nearly 60MB exe file from the PC Login Now website. Open the downloaded file to extract the ISO image of the Live CD. Burn the ISO file to a compact disk and then, boot your computer using the burned disk. PC Login Now will automatically load. Follow the on-screen instructions to choose your operating system and then the username whose password you wish to reset.

Then, choose the Password is empty checkbox to remove your password. Then, PC Login Now will ask you to reset another user's password. Choose No and then OK to restart your PC. Use a blank password while logging in and you are good to go. PC Login Now works on Windows 7, Windows XP and Windows Vista.

Offline NT Password Recovery & Registry Editor
Another open source recovery software that resets forgotten Windows passwords. Offline NT Password Recovery is also needed to be installed on a CD before working. However, there is also a version that can be installed on USB drives to create a bootable usb drive (if your motherboard supports it). Its small size (nearly 3MB) makes it an excellent alternative to other bulky recovery options.

Password Recovery Windows

It just has one con. Its interface being completely text based is not for the lovers of GUI based systems. To reset your password, just boot into your computer using the Live CD or the USB drive and follow the on-screen instructions. Your password will be changed to a blank one. This software works on Windows 7, Windows XP, Windows NT and Windows Vista. It also supports 64 bit versions of these Operating systems.

Cain & Abel
Cain & Abel is another free password recovery software. Unlike the software mentioned above, Cain & Abel needs to be installed on another administrator account on the computer containing the locked account. It also requires separate downloading of rainbow tables. Since, you can use inbuilt Windows functions to reset a password if you have access to a working admin account on the computer, I see no use for this software unless you are desperate about recovering your password. Cain & Abel works only on Windows XP.

Friday, October 18, 2013

Top 4 Methods To Remove Write Protection From Your Pen Drives / Memory Sticks


In most of the USB based flash/pen drives, write protection is provided via the small notch. First of all look for it in sides of your drive. It’s even marked with lock/unlock symbol. Move/slide the notch to unlock position (means releasing write protection) before you perform any file operations in your drive such as copy/paste/format etc. After that you can slide back the notch to lock position safely.
But many of the pen drives don’t provide hardware lock/notch for write protection. Instead they back it up by means of some software/tool. From there you can change the write protection lock/unlock option. Refer to your pen drive’s manual for more details in this regard as different pendrive have diferent ways to to unlock them or otherwise you can also take help of some tools to unlock them.
Best Methods To Remove Write Protection From Your Memory Sticks / Pen Drives Goes here (ENJOY AND POST FEEDBACKS TOO)
METHOD #1 
  1. Open Registry editor of your PC
  2.  For this you should type command “regedit” on run.
  3. Successively navigate to following linkHKEY_LOCAL_MACHINE\SYSTEM\Currentcontrolset\control\storatedevicepolicies( Note: if you can’t find “ storatedevicepolicies ” after “control” folder then you need to create it. For that follow instructions       mentioned below )
    • Open a new note pad file.
    • Copy this
      cd\reg add “HKLM\System\CurrentControlSet\Control\StorageDevicePolicies” /t Reg_dword /v
      WriteProtect /f /d 0
    • save it as DISABLEWP.BAT
    • Then copy it to start up folder.
  4.  In right side u will be getting writeprotect option, just right click that and modify the hexadecimal value from 1 to 0
  5. Restart your PC and enjoy!!!!
    ( Still having problem???   Don’t worry try other methods below )
============================================================================================
METHOD #2
If you have transcend pen drive infected by 9u.exe which is a write protect virus then the following works like a charm:
1) Download JetFlash online recovery from:
www.transcendusa.com/Support/DLCenter/Software/OnLineRecovery.exe
2) Run the program
3) Specify the capacity of your drive eg.512 MB, 1 GB …..etc
4) Choose “repair and erase all data” OR ” repair and keep existing data”
5) Progress bar starts…….completes
6) Notification appears —” format complete”
7) Unplug and plug your drive and …..presto
enjoy!!!!

( Still having problem ?   Don’t worry try other methods below )

============================================================================================
Method #3 
1. Start > Run  -> type “CMD” and press enter
2. type< diskpart
3. type< list volume
4. type< select volume # (# is the number of the USB HDD you’ve pluged in)
5. type< attributes disk clear readonly
(If you need help while typing commands then type “HELP FORMAT” on command prompt)
============================================================================================
METHOD #4 
There are a series of options in the Group Policy Object Editor that deal with read/write permissions on hard drives and removable media.  I basically changed their individual settings from “Not configured” to “Disabled”.
Start -> Run… -> gpedit.msc -> OK
Computer Configuration -> Administrative Templates -> System -> Removable Storage Access
In here I disabled all of the “Deny read access/write access” options; you may only want to disable the ones relating directly to the type of media that you want to access.
Here are the ones I changed:
Removable Disks:  Deny execute access
Removable Disks:  Deny read access
Removable Disks:  Deny write access
Double-click each one and select the ‘Disabled‘ radio button.
Do the same as above, except the first step is “User Configuration” instead of “Computer Configuration
(Best result if you try both method #1 and method #4 together)
Enjoy!!!
All the methods mentioned are tested and they works well in my PC.
Please don’t forget to leave your feedbacks below as comment and lets discuss if more tricks are needed…
Thanks and Regards
GAMER

Thursday, October 3, 2013

An amazing chance to learn online for free

It's a largest online learning organisation
click here to register on the website for free
you can pick any courses from mechanical to it related fields
enjoy !! your time on the internet